New Year, New Home: Part 2 - A Functional Room that Brings You Joy
/
Resolve to love where you live this year! Here are a few tips to getting a functional room that brings you joy.
Read MoreResolve to love where you live this year! Here are a few tips to getting a functional room that brings you joy.
Read MoreWhile we love creating beautiful spaces for our clients, we also place a huge importance on function as well. When your home is clutter free, it functions at its best and as a result, so do you. Here are five tips to a clutter free home.
Read More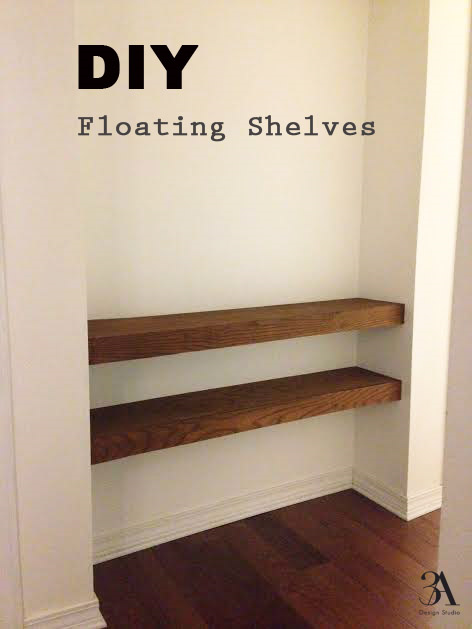
After writing my post on mudrooms and sharing my frustration with the lack of organizational space we have, Mr. Nguyen told me to pick a weekend and we would knock out the hall project that I have been wanting to complete for over a year. Not only was I surprised that hubby reads my blog posts, I was thrilled to finally get the project done!
Meet our subject. This is the hall leading to our garage. When we moved in, it had been a narrow linen closet with even narrower floor to ceiling shelving and ugly bi-fold doors. The shelves were too narrow to fit much of anything on, so about a year ago we had the shelving removed and the walls patched up. It remained that way until this past weekend.

Since the alcove is too narrow for a bench, the plan was to build a couple floating shelves to act as a an area to display some art and also house keys and such.
After, it was decided to make the shelves approximately 10" deep x 3" high, the following items were purchased:
(2) 1x3x8 -one for each shelf (1) cabinet grade sheet of 1/4" 4x8- for the top, bottom and front piece for both shelves (1) pack of 1/4 toggle bolts
(1) can of Rustoleum stain in "Wheat" (1) Minwax stainable wood filler (Go with the larger size. I bought the smaller container and ended up needing more.)


To make it easier to transport, we had Lowe's cut down the 4x8 sheet into 4 top and bottom panels and 2 fronts which made the installation go quicker. The first step was to create a skeleton for each shelf using the 1x3x8. *Keep in mind when cutting the outward extending pieces to deduct both the depth of the back brace and front panel from your overall length so that you achieve the correct fished shelf depth. Also note, a 1x3 is not really 3" but actually 2.5".

The skeleton was then bolted to the wall and then the front, bottom, and top panels were nailed on.

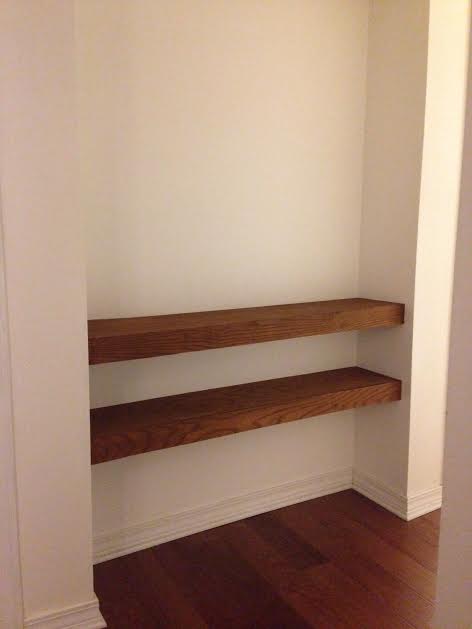
I did not bother conditioning the wood before applying the stain. Once, the stain had dried it was a bit too yellow for me. The store had already closed and since I was on a roll, I decided to give Dana's coffee stain technique a try. One thing to note, use caution when brushing the coffee near the walls. Since it is very thin, it got underneath the painter's tape in some areas which I had to then go back and paint over.

It may be hard to tell from the pic, but after three quick coats of coffee the shelves had achieved a warmer tone that I liked. I definitely recommend using coffee as a stain. Not only is it cheap but smells good, as opposed to the toxic fumes that traditional stains have.
Well, there you have it. Now comes the fun part of decorating. If money were no issue I would purchase one of Jai Vasicek Malachi paintings and it would look something like this.

And on the adjoining wall a row of matte black hooks like this one.

Vasicek has a waiting list for his paintings, if that gives you any indication of the likely hood I would be able to procure one. So, I am thinking about painting an interpretation of his Malachi series. Eek! I will keep you posted if I get the nerve to do it.
Have a good one!

After a nice Christmas break, life is back to normal in the Nguyen casa. Per usual, when Angie came home from school yesterday she dropped her book-bag, lunch box, gym bag and shoes all by the front door and they stayed there until the next morning. It had me wishing for a beautiful mudroom to neatly store all of our bags and shoes, much like the ones below.
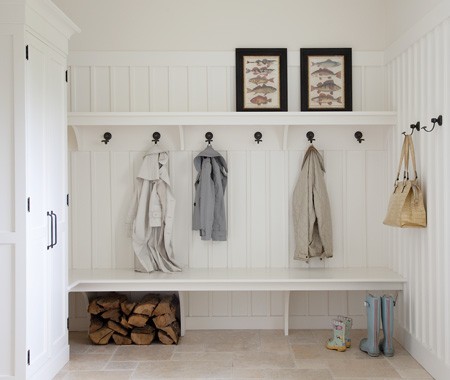
Image Via

Image Via

Image Via
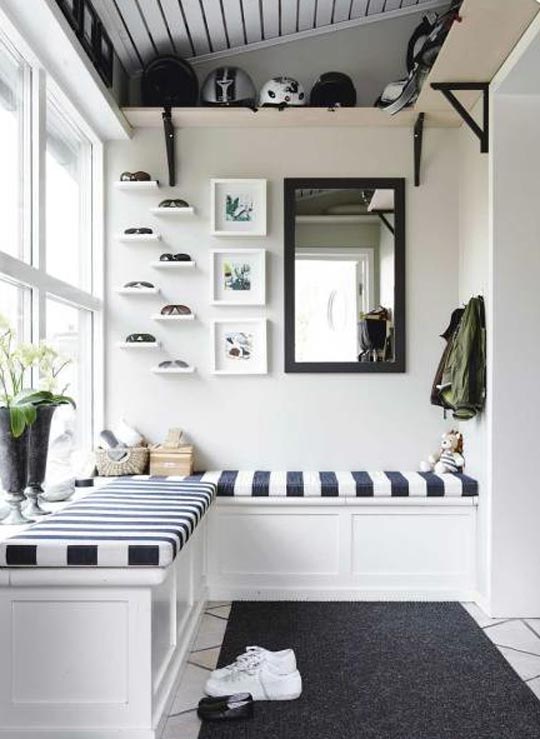
Image Via
Instead, I have to settle for wall hooks. Boooo!
As I mentioned before, our house has little storage and what storage we do have is packed. One of our many projects is to extend our laundry room into a portion of the sun room for extra storage space. So, until then hooks will have to do. By the way, I hope to give you guys a look at our progress in the sunroom soon. I have been waiting FOREVA on the window shades to be delivered. Apparently, they have made there way to a port in California that is currently on strike. Okay, back to wall hooks.
So far, Pottery Barn's cast iron row of hooks is the top contender.

If you are interested in creating a mudroom or a organizational area but do not want to go down the custom route, there are some really great hall trees on the market. Hall trees are especially great for renters as they do not need to be affixed to the wall. Here are two that I really like.
Until next time, lovelies.