Amelia's Nursery Reveal

opt1.jpg

I'm baaaack. Took some time off to enjoy my new little nugget, Amelia Skye. This little being has brought us so much joy. After almost thirteen years, I love being a new mom again.

The day we brought Amelia home, it was so neat to show her her room that I had put together while she was in my womb. I still have a few finishing touches but figured I would go ahead and show you.

If you recall this was the inspiration for the room. I wanted the room to be fun and yet classic at the same time. The room was designed around this sweet flamingo print by Bella and Bunny. Originally, I had planned on wallpapering the wall behind the crib. However, after considering the way the walls stagger and the small size of the room I decided against it since it would make the room feel more choppy. To serve as a soft backdrop, I chose Benjamin Moore's Classic Gray for the walls.

Slide1.jpg

The inspirational glider was beautiful and came with a hefty price tag of over $1000. I was not sure how much I would use it. So, instead I found a vintage bentwood rocker with nice lines and painted it white. Well, Ty painted it :) Not bad for $45 and a couple cans of spray paint. It is pretty comfortable too.

With a lack of storage in mind (Amelia and I share the closet space), I chose this great crib with underneath storage from Target.com. The sheet is from Target.com as well.  Pillows are a Tuesday Morning find. The blanket is a handmade gift from a friend along with the tassel garland. And the book ledges are from Ikea.

DSC_0186.JPG

 I created a cute little dressing valet for Amelia with these sweet little shelves from Land of Nod.

DSC_0522.JPG

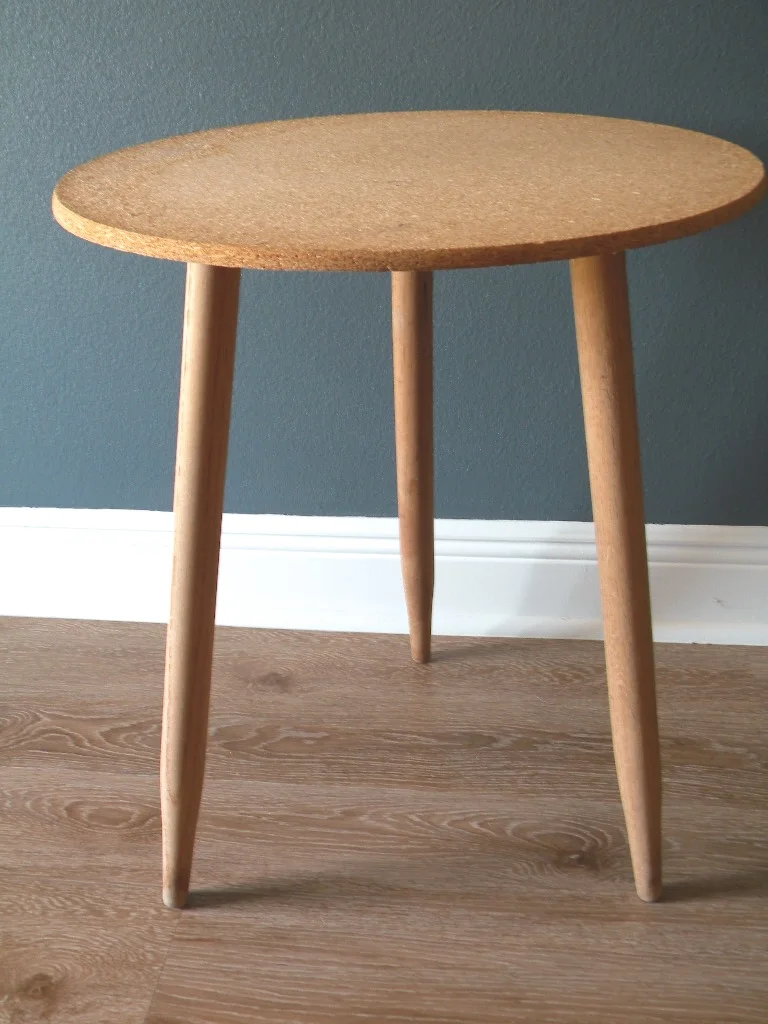
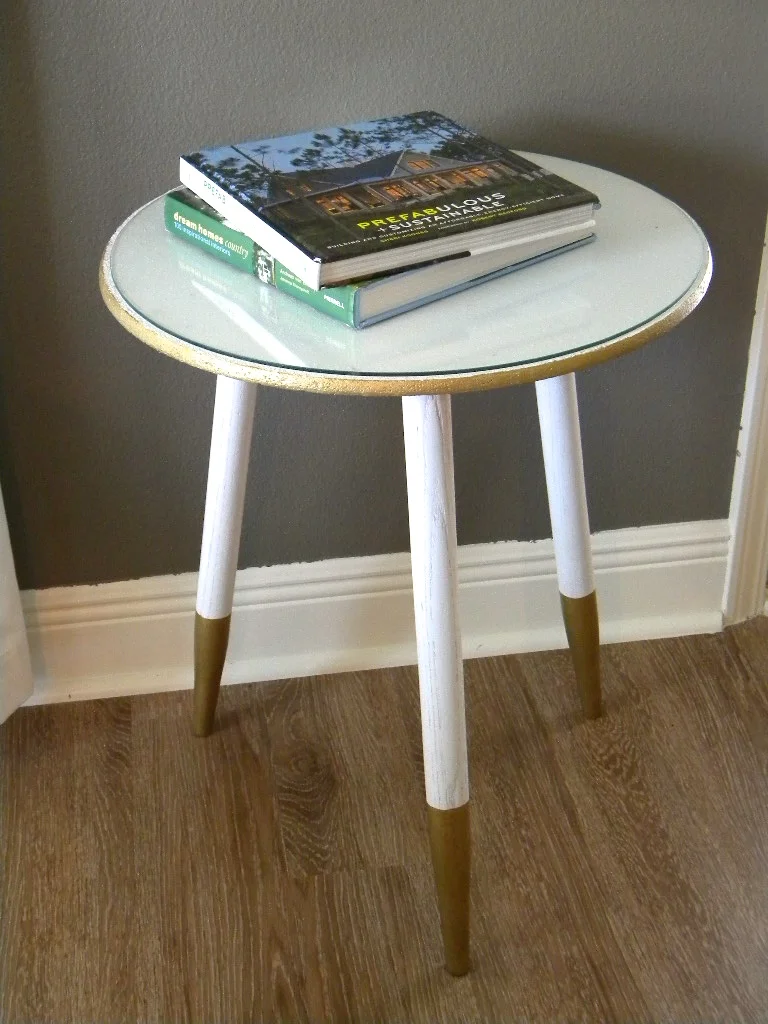
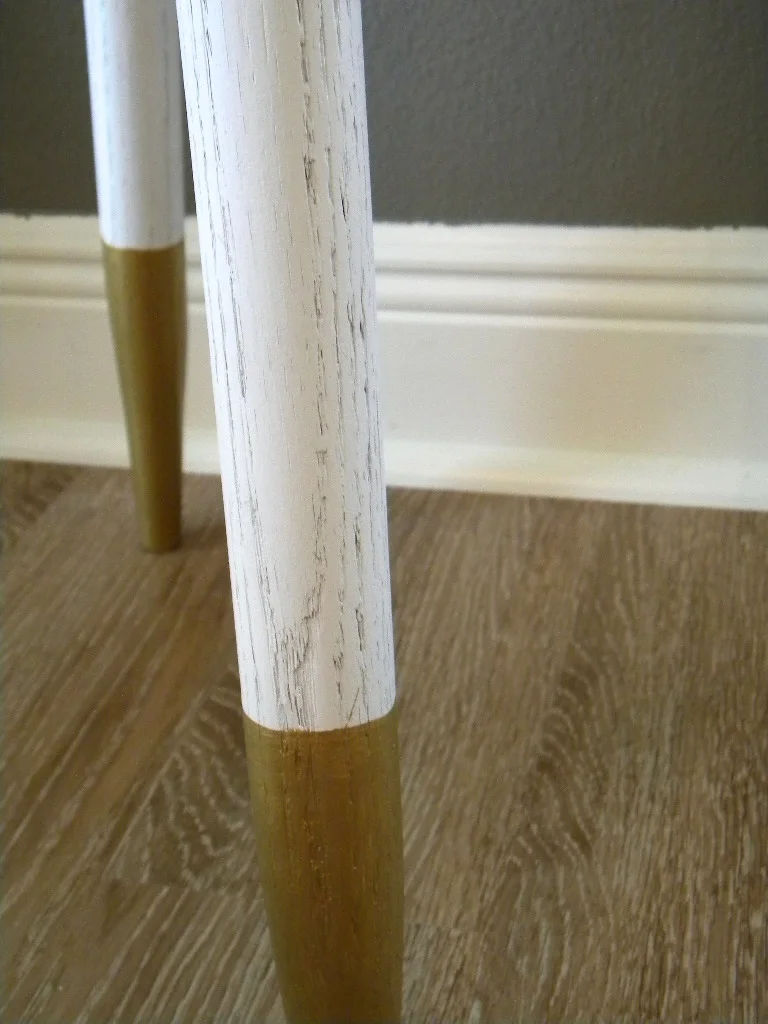
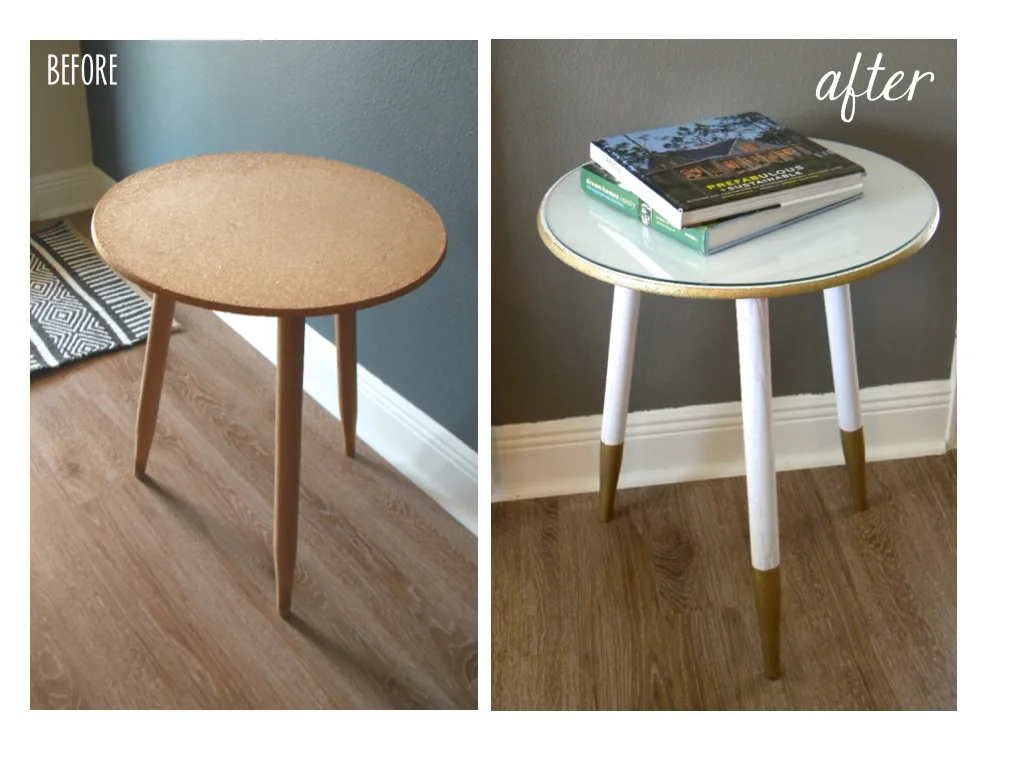
The original design included a starburst light fixture but I wanted something a little more girly. Came across this light fixture on a trip to Home Depot. Attached a tassel and got instant glam for about $100. At night it makes the most beautiful patterns on the ceiling and walls. The side table was another vintage find.

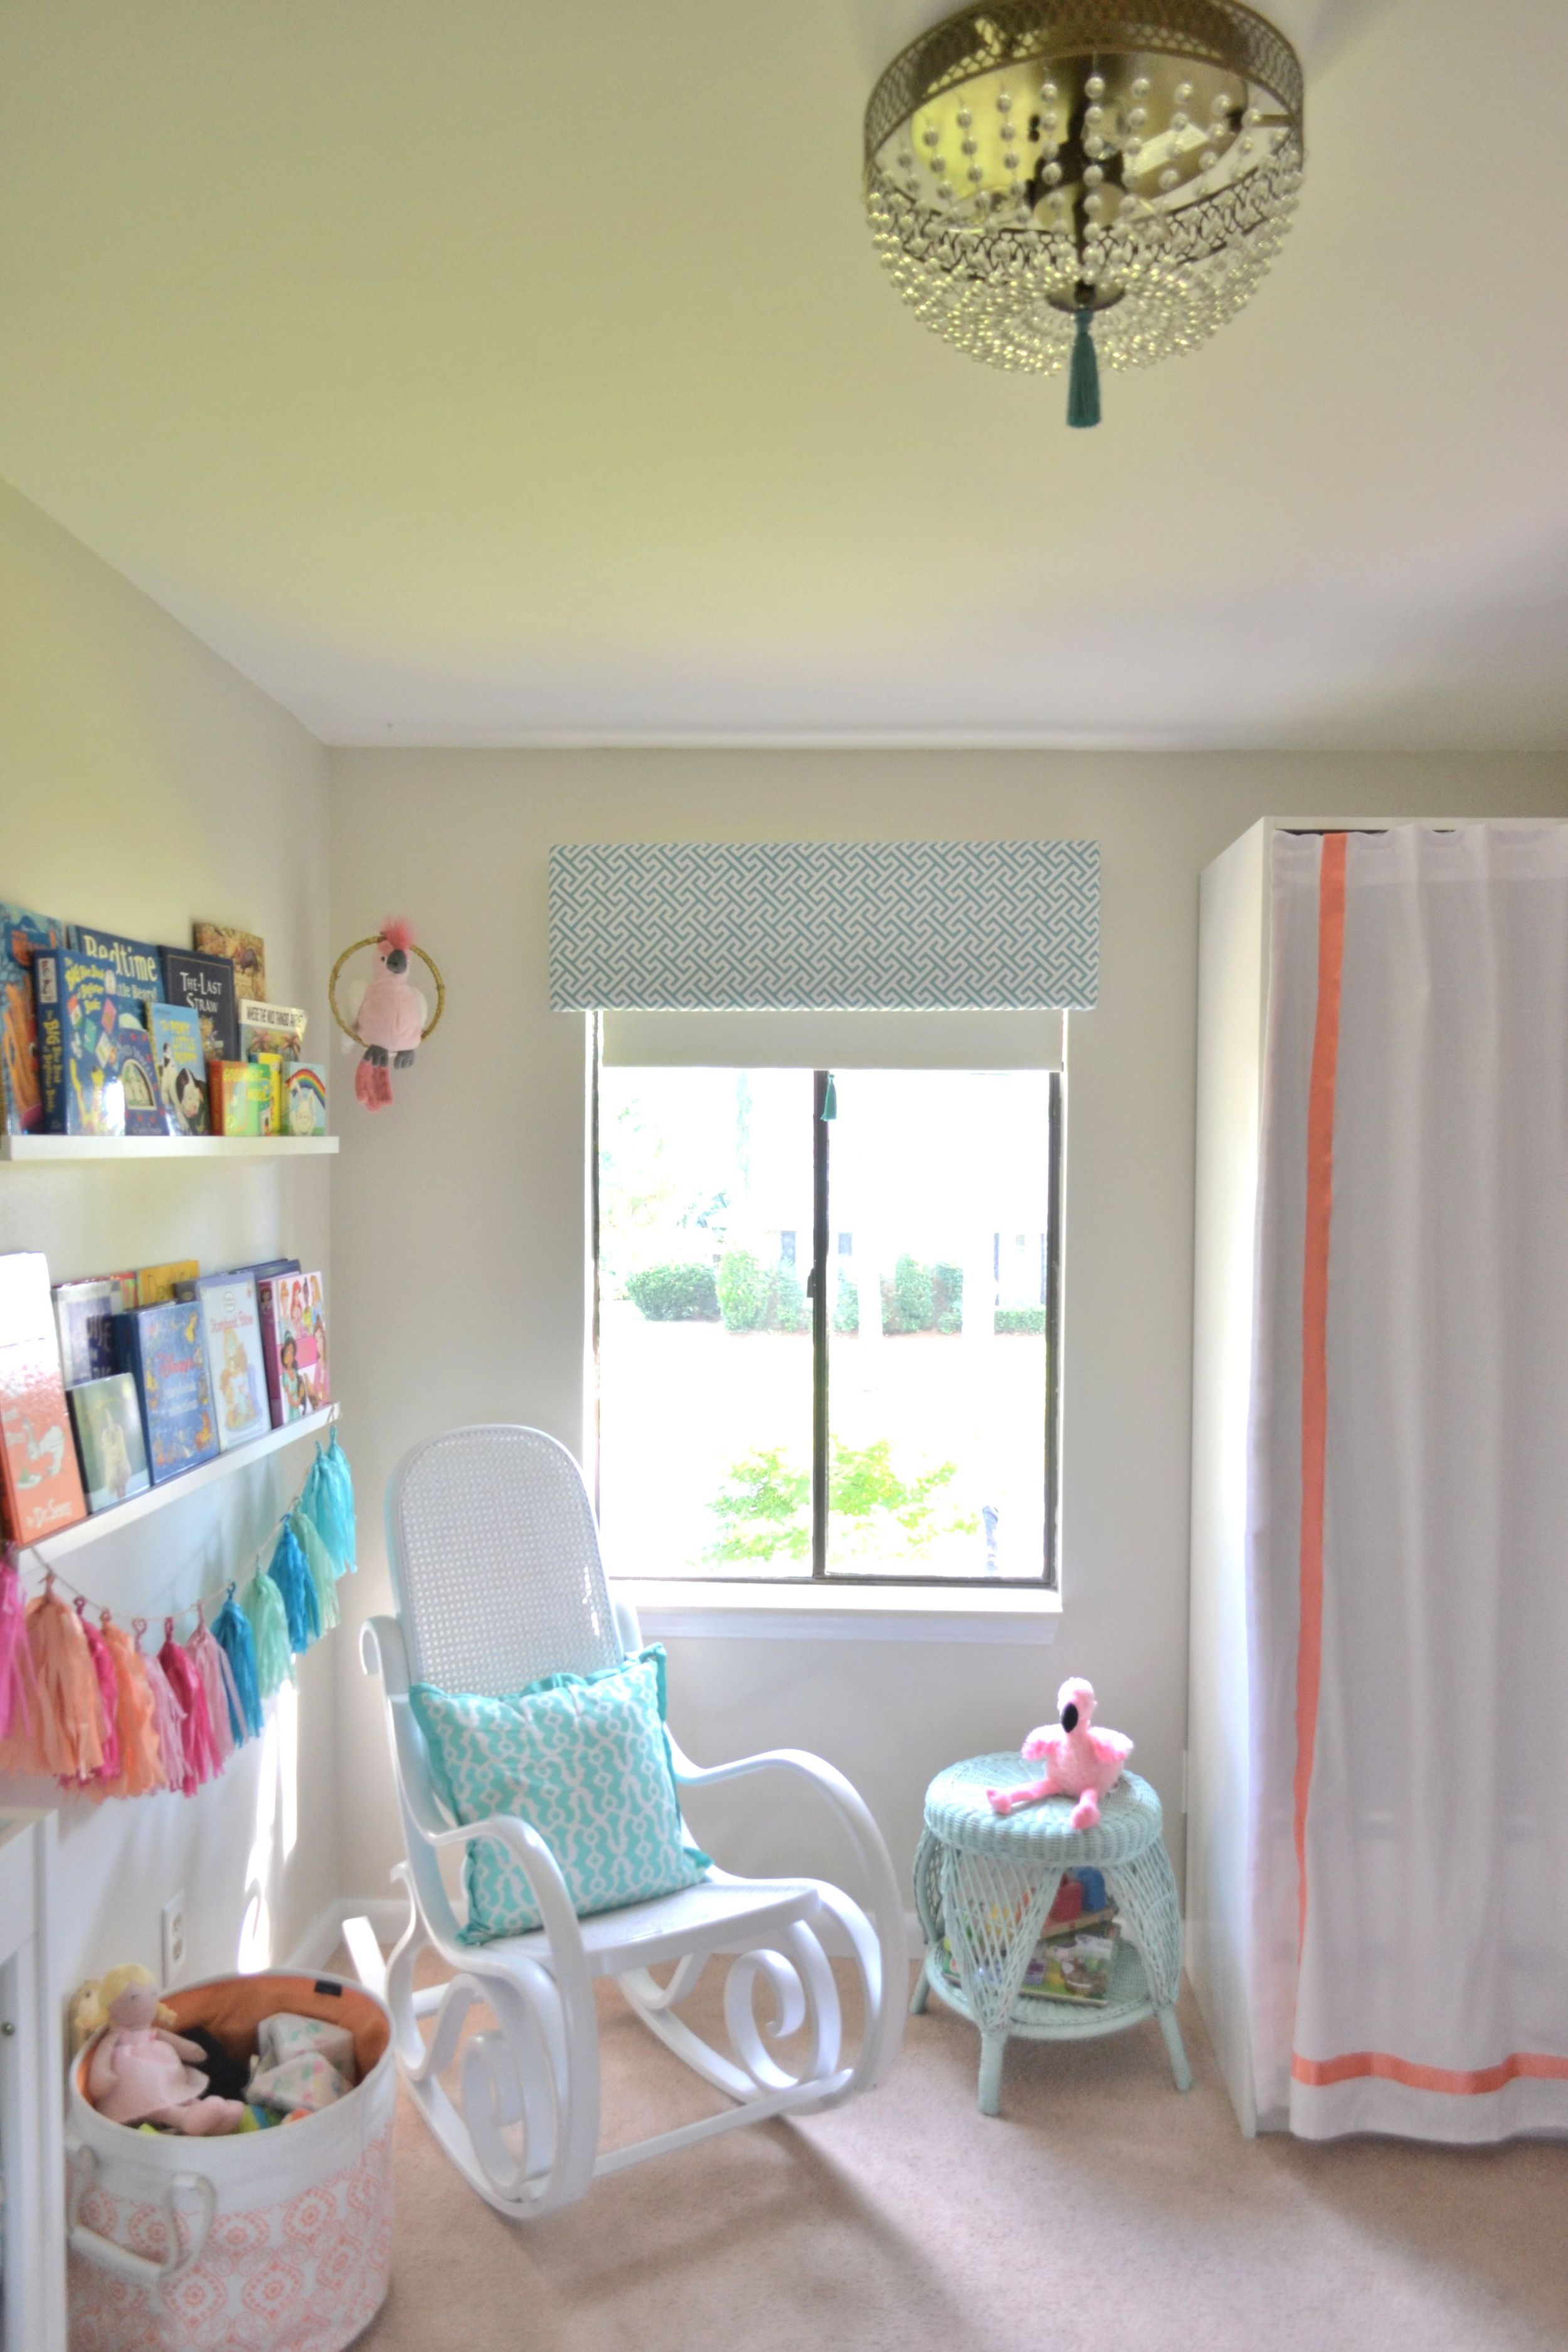
This little guy used to belonged to big sister. I sprayed painted an embroidery hoop and wrapped gold twine around it. Now he has a place to perch.

DSC_0584.JPG

The painting is of Ty and I looking over Amelia. Ha! Just kidding. I know it is not the typical art you would find in a nursery but I love it! It has the Palm Springs vibe that I was going for. The pineapple print is by yours truly and the dresser was another vintage score. You can check a DIY I did on it here. The changing pad cover was a custom order from an Etsy store.

DSC_0549.JPG
DSC_0581.JPG

Though there are a couple items I would still like to get, overall I am happy with how the room turned out. Looking forward to creating many memories in here.

jessicasignature.jpg

Memo Boards

I've been in "Operation: Purge the Magazines" mode for quite a few months around here.  I seem to weed a few out here and there but then more just show up.  I have an obscene amount of magazines sitting on my couch and coffee table ottoman at the moment. I typically like to have a few laying around for inspiration and for guests to browse but there comes a time when enough is enough.  

I typically dog-ear the pages in magazines that I want to reference later so I can tear them out, pin the information or add the recipe to my recipe binder.  When the stacks get too high, I start to get anxiety about the amount of sorting those bookmarked pages will require.  That's why I love memo boards--good, ol' fashioned memo boards.  

Pinterest is a wonderful thing, but when you have something tangible you want to save (and don't want to clutter your surfaces) a memo board is the way to go.  Once you have the board on the wall, adding images, quotes and fabrics is the easy and beautiful part.  Here are a few different boards you can buy or better yet, make!

Use tacks and string to create your own board.

Use tacks and string to create your own board.

Or you can use a whole wall to tape up your favorites.

Or you can use a whole wall to tape up your favorites.

Or turn an ordinary cord board into something beautiful with linen fabric and decorative nail heads.

Or turn an ordinary cord board into something beautiful with linen fabric and decorative nail heads.

You can even create your own design.

You can even create your own design.

Magnetic chalk paint is a great option as well!

Magnetic chalk paint is a great option as well!

An empty frame and some chicken wire can be another solution.

An empty frame and some chicken wire can be another solution.

Who is inspired now?  I know I am.  Now to just decide which one I can add to my office...  Then I can finally rid my home of some clutter and make my walls a beautiful backdrop full of inspiration! 


*Click images for sources

color dipped furniture and DIY

Color dipped furniture is something I've enjoyed lately. It's a fun spin on the color-blocking trend in the fashion and design world, but it's not too crazy or permanent (especially if the piece is inexpensive--I find it's best to execute trends these ways). 

Here are some fun examples:

{click on image for source}

This one showcases inverse dipped leg as well, on the painted chair hanging from the wall. It also showcases a beautiful strawberry long-haired dachshund, my favorite animal on the planet (as in dachshunds in general, not just strawberry or long-hai…

This one showcases inverse dipped leg as well, on the painted chair hanging from the wall. It also showcases a beautiful strawberry long-haired dachshund, my favorite animal on the planet (as in dachshunds in general, not just strawberry or long-haired ones).

You can have fun with it too--it doesn't have to be solid!

You can have fun with it too--it doesn't have to be solid!

You get the idea. A google search loads tons of examples. It's easy and it's fun. You can pretty much color dip anything with legs. What about me, Dana? I have legs. Can you color dip me? (Anyone pick up on that reference????) 

Onto the good stuff...

So one day, we were meandering about town through the back-sides of buildings and alleyways, and low and behold, a side-of-the-road pile of stuff with a "merry christmas" yard sign in front (which I hope was an intended pun by the leaver of the stuff). Most of it wasn't even trashy! There really are some benefits to living amongst rich people, I guess.

And I picked out this little gem.

A perfectly good, perfectly usable little table, just awaiting some TLC. 

Now enter my color dipped DIY segment of this post....

This little guy was just begging to be color dipped. Really, I wanted to stain the whole thing to give it a richness, but you can see that the top is nothing more than weathered particle board. So I decided to paint the whole thing and then color dip the legs. 

I went with white and gold for two reasons: 1. I like the color combo, and 2. Those were the only usable spray paint/paint colors I had to use (besides yellow and cream, whose presence were a mystery to me--I mean really? Cream?).

And here's the end product:

Please excuse the uneven paint lines at the wall trim!!! Painters tape turned out to be not as great as they make it sound (I'm much better with a good angled brush). We've yet to get around to finding out what color the trim is and correcting those…

Please excuse the uneven paint lines at the wall trim!!! Painters tape turned out to be not as great as they make it sound (I'm much better with a good angled brush). We've yet to get around to finding out what color the trim is and correcting those obnoxious paint lines. Even designers have houses that stay in a state of half-finished...in fact, I think we're worse because we are always putting our clients first! 

Looks pretty good, huh?? I really wanted to lacquer the top to give it a smooth finish, but when I found the table, it came with a glass top, so I just cleaned that up, turned the chipped edge to the back, and it looks pretty dang good as is.

I decided not to sand the legs or use too many coats of paint on them. Having the wood grain show through gave it some character. A little rustic-ness to pair nicely with the gold dipped legs. 

Also, for the record, the furniture isn't literally dipped (although I've seen some DIYs that literally dip furniture...guess it depends on how much paint you have and how much of a mess you want to create). I just measured up an equal length on each leg, painted a band around the leg, and filled in the rest with a paint brush. It took no time at all. You could, I suppose, use painters tape, but I don't recommend it (based on the outcome of my trim in the background).

I also used some clear acrylic medium to infill some of the roughness of the particle board on the edge of the top, and then painted it gold as well. It's not totally perfect, but I like the gold band. 

Here's one more look with a before and after:

Such a happy little table. I'll get a nice indoor plant for it eventually (I'm really lacking in the indoor plant department). It was fun, easy, and a great transformation.

Hope that inspires some of you DIYers! 

Until next time!

Client Collaboration

As designers, we get a wide variety of clients.  Some of them need a lot of assistance, some need to know how to make their already great pieces work in their space and some just want the finishing touches to make their home beautiful.  We love getting to work with each kind, but the best kind, in any situation, is when we can use our knowledge and expertise and mold it with the client's dreams and wishes to create some amazing.  

Sometimes we have all of the answers right away and sometimes there's some back and forth where we need to learn more about the client, their home and what exactly they desire.  Design is ALWAYS an evolving process and almost always involves some sort of detour.  But often, it's in the detours that you find something beautiful that you never considered before.  That's what happened recently with a client of ours in Seattle.

We were working on their living room and suggested painting their gold toned walls a lighter, gray to help neutralize and brighten up the space.  Their ceilings were also in the gold color so we obviously suggested those be painted as well--in white, to light the room and lift the space.  Well, we soon learned that the client's husband wasn't fan of white ceilings (some times you just can't know it all from the start!), so we were back at square one.  The ceilings had a continuous flow from room to room so a single color would still be necessary to keep a good flow.  The question was "What color?"  That's when our client had an "ah ha" moment and thought "What if we paint them light blue?!"  She quickly added a light blue swatch to ceiling next to the potential gray wall color already in place and sent the mockup our way along with a few real room images as a visual to see what we thought.

Click on image for source

Click on image for source

We were immediately in love with the look!  And the fact that the client was able to marry our thoughts with a new idea to create something neither of us would have considered at the start, made it even better!  That is where the best designs live in my opinion.  

Click image for source

Click image for source

I've always loved painted ceilings (especially on porches) and can't wait to see how this one will turn out!  I think it will work so well in their 1960's home that they have labored on for several years to make so beautiful.  We are just so grateful that they trusted us to be a part of the process!

In closing, here are a few more light blue ceilings to get you salivating :)

Click image for source

Click image for source

Click on image for source

Click on image for source

Click image for source

Click image for source

Click image for source

Click image for source

How can we collaborate with you on your next project?  Contact us today.

signature Mallory.png


Hardware Round-up: Best Furniture Knobs under $5

Well, I thought I was going to have a cool DIY dipped-leg table project to show y'all today, but it turns out, the little guy is going to need a nice lacquering on top and I just didn't have time for all that before today. Next week, hopefully! 

So onto my next future project...

I've been thinking about "hacking" this Tarva 3-drawer dresser from Ikea for either our entry or strange and awkward dining room turned toddler kitchen/play area. Our entry is not that wide, so it's 15" depth is perfect--just enough for a small lamp and bouquet of fresh flowers.

And what Ikea hack project is complete without custom knobs to really make it pop? 

So I did a little searching to see what kind of cool knobs I could find out there, and here's what I came up with. These aren't your standard, run-of-the-mill chrome bars. I like to get a little funky with my hardware. After all, it's a great and inexpensive way to give your furniture some personality when needed. For an entry piece, that would be perfect. Check 'em out:

1. Hickory Hardware Rectangular Cabinet Knob in Antique Brass from Lowes: $4.81 // 2. Stone Mill Hardware Ashton Knob in Satin Nickel from Overstock: $13.39 for 5 // 3. Liberty Hardware Black Round Knob from Home Depot: $0.98 // 4. Turquoise Round G…

1. Hickory Hardware Rectangular Cabinet Knob in Antique Brass from Lowes: $4.81 // 2. Stone Mill Hardware Ashton Knob in Satin Nickel from Overstock: $13.39 for 5 // 3. Liberty Hardware Black Round Knob from Home Depot: $0.98 // 4. Turquoise Round Glass Knob from Hobby Lobby: $4.99 // 5. White Ceramic Knob with Gold Metal Top from Hobby Lobby: $3.99 // 6. Hickory Hardware Conquest Brass Octangular Knob from Lowes: $2.52 //  7. Brainerd Serafina Chrome Octangular Knob from Lowes: $3.97 // 8. Classic Hardware Distressed Antique Brass Flat Top Knob from Vandykes: $2.66 // 9. Light Green Ceramic Scallop Knob from Hobby Lobby: $3.99 // 10. Flat Black Ceramic Scallop Knob from Hobby Lobby: $3.99 // 11. Antique Brown Glass Knob from Hobby Lobby: $4.99 // 12. Hickory Hardware Round Cabinet Knob in Antique Brass: $2.84

I'm really loving the green scallop. That would be so pretty on a charcoal painted dresser with gold feet (which I'd also like to replace...maybe put it on some small antique casters...). And the great thing about Hobby Lobby is they have their hardware on sale for 50% off pretty regularly. And if they are short on the number of knobs you need, they'll order the rest in for you at the same discounted price. 

What's your go-to place for interesting hardware? 

I'm always on the look-out for great sources. If there's one I've left out, drop us a line!

Until next time...

Gray Master Bath - Before and After

As I mentioned to you guys a couple of weeks ago, I've been wanting to paint our master bathroom for well over a year.  Well friends, it's finally happened!  The hubby and I tag-teamed it yesterday and got it done.  I don't know why we waited so long!  

IMG_7000.JPG

Thankfully my in-laws watched the little one so we could focus and get it done with few distractions.  It took us less than four hours (not counting drying time between coats), and I am oh so happy with the outcome!  The color I chose was Mountain Smoke by Valspar.  Here's some proof on how much a can of paint can really transform a room!

Before:

If you look at the area between the mirror and the window, you can see a bit of the faux finish previously there.

If you look at the area between the mirror and the window, you can see a bit of the faux finish previously there.

After:

IMG_7007.JPG
Valspar Mountain Smoke 4

I absolutely love how the gray paint immediately elevated the look of the tiles and the space.  It looks so much more put together and sophisticated (and no more faux finish!).  The previous green did little to compliment the existing tile, but now the color pics up on the veins that run through it. And despite the walls being a darker color, everything looks more crisp and bright in there now.  I'll be honest.  This would not be my first choice in tile, but I wasn't going to spend lots of money on something new, so I had to work with it.  And I think the gray was definitely the best choice. 

IMG_7001.JPG

All day yesterday I kept telling Jon "I love it!  What a change!  I'm so glad we did this!"  It's been while since I've been that ecstatic about a paint job.  And he likes the final outcome too (which is good since he did a lot of the painting!).  Overall, I couldn't be happier with our $65 project (including the paint rod extender).  My master bath finally feels just as it should!

I'll leave you with one more before and after shot for comparison:

Gray bathroom

Are there any projects that you've been procrastinating on?