my best road find yet!
/On a busy Saturday last weekend we were headed to a birthday party and were already late. Little did I know we were about to be even later, because here we were driving down the road (quickly, I might add, since it was a country highway), when all of a sudden...
"JENNY LIND! JENNY LIND!" I exclaimed, interrupting whatever my husband was talking about. Luckily he didn't lose control of the car, and, since he knows me well, instantly knew he needed to turn the car around. These eyes don't pass over a design treasure!
Out at the end of a long driveway, propped up on a telephone pole with a spray-painted cardboard sign reading "for sale" was this:
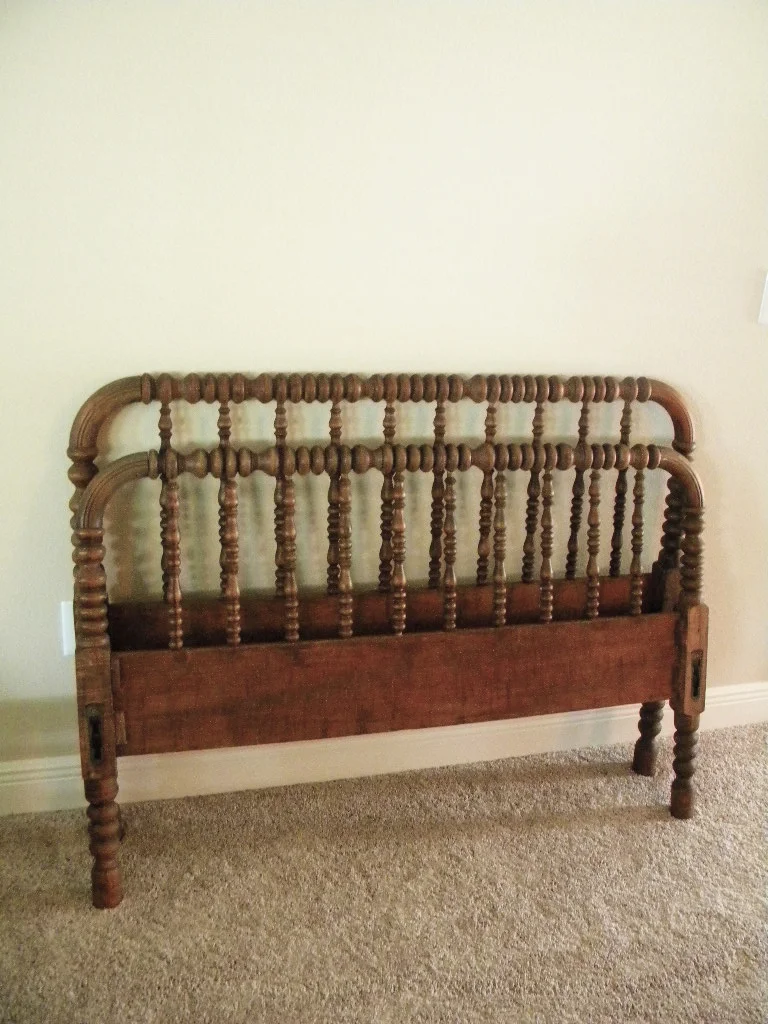
A spindle wood, Jenny Lind style bed, with frame. $50. In great condition and obviously an antique. After looking it over, I handed the man $50 (thanks to our loosely followed Dave Ramsey envelope method for budgeting, we actually had cash) and we loaded it in the car. A very good reason to be late to a birthday party, I should say!
So then, we had to figure out what to do with the bed. My first thought was to incorporate it into our toddler's transformation from nursery to toddler room, especially since she already has Jenny Lind furniture, but I want to be able to use the two antique twin beds we already have. The bed frame, as it turns out, is a full bed, so that would be a little much for her.
So I turn to my guest room. It has a queen bed, but the full bed can easily made to fit a queen mattress with a little handy work from my husband.
This is what it looks like now.
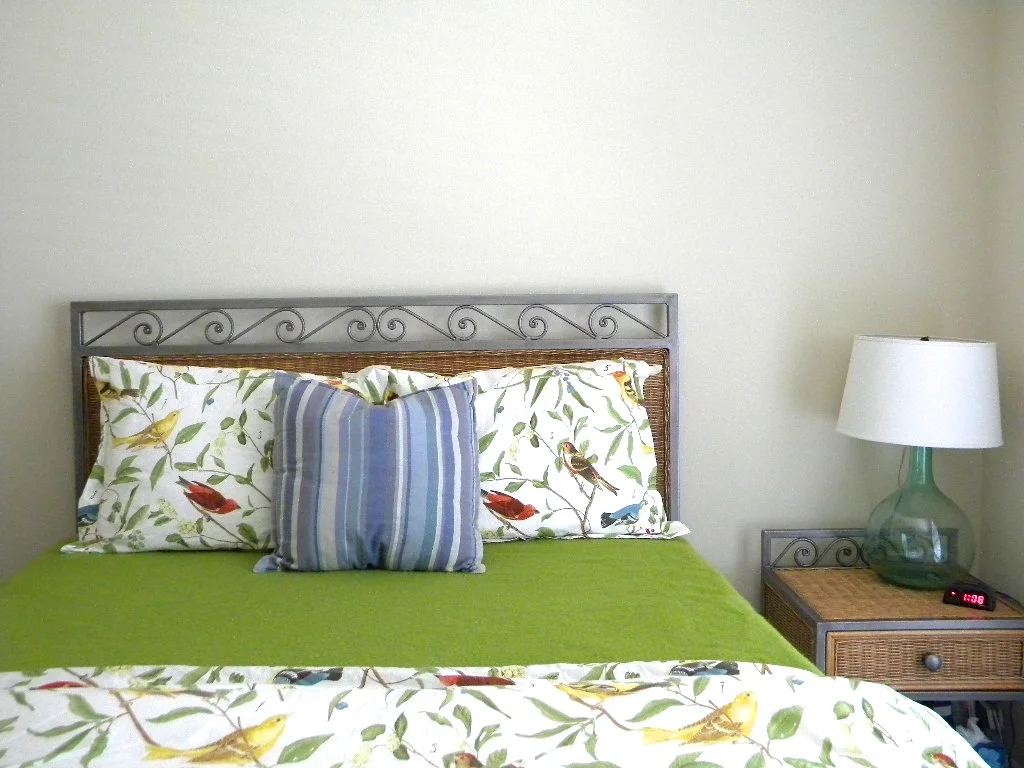

I've had the set since I was a teenager. It's held up nicely through the years, but you can definitely tell it was picked out by a teenager (and a little dated). Even still, this is probably my favorite room in the whole house. It has a huge front, south-facing window that gets great light. I got the duvet cover as a wedding gift and I absolutely love it. It's so cheerful. And because this room generally stays untouched by our toddler, it's always clean ;)
So it makes me happy to give this room a little bit of attending to.
{I know you're probably thinking, Cool, cool, butttt, are you ever going to actually finish a room in your house? And the answer is, probably not. Welcome to the life of a designer!}
This is along the lines of what I have planned for this room:
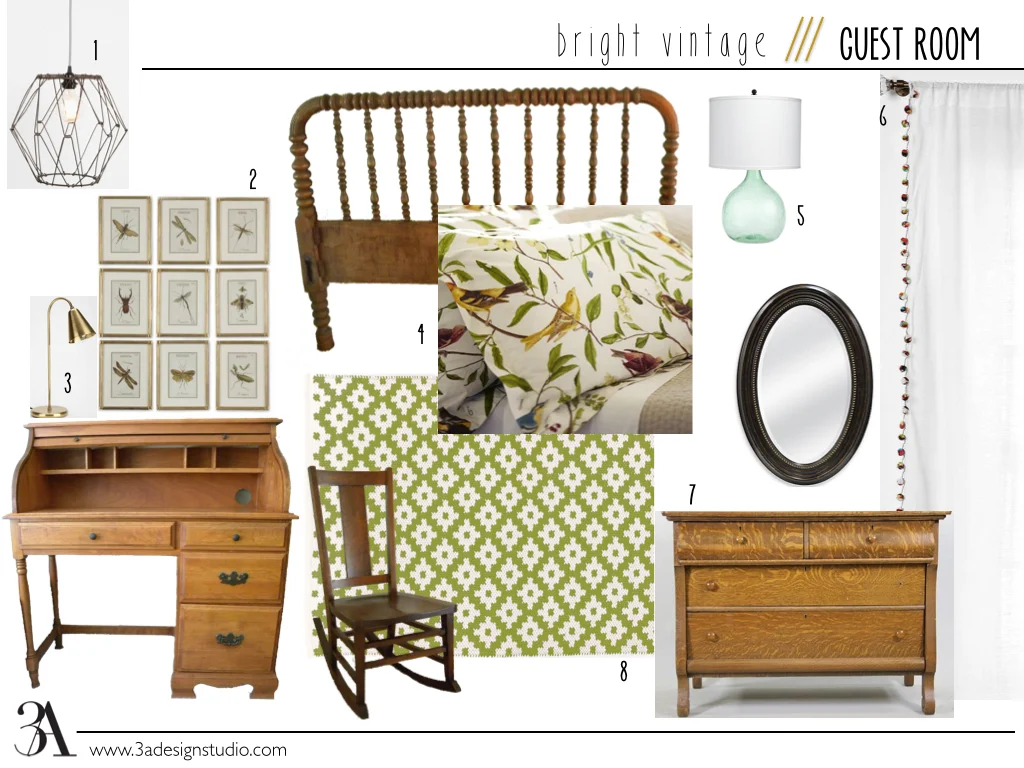
1. Convertible Wire Pendant from Urban Outfitters // 2. Insect Prints (I bought a while back) // 3. Assembly Home Cone Table Lamp // 4. Bird Duvet Cover (originally from Pottery Barn) // 5. Eva Colored Glass Lamp from Pottery Barn // 6. Magical Thinking PomPom Curtains // 7. Tiger Oak Antique Dresser // 8. Dash and Albert Samode Rug
The paint in the room is the taupe that covers the whole house. I probably won't change it anytime soon. It works in the room and it has the potential to turn into another kid's room down the road.
The Desk at the bottom left is a roll-top oak desk that we got for free (!) from a friend. I haven't decided what to do with it, if anything. Probably just replace the hardware. The stain looks really great under my bug prints that I so adore. The rocker is a family heirloom that I have already in the room. It's called a nursing chair--it's small and armless (for before our comfy gliders came along to nurse babies in). The mirror I got at TJMaxx several years ago, and the Tiger Oak dresser is just an inspiration photo. I'd like something like that, or a bench of some kind. I may even move my daughter's Jenny Lind changing table in there and convert it into a storage piece.
We almost had it put together for you to see in the room, but the frame is too short for a queen mattress, so the hubs has to do some more adjusting. He widened it, but we never guessed the length would be an issue!
I'm not usually a finder of good deals like this bed. I can spot treasures like a hawk, but usually people know what they have, and we never have the money to compensate them for their knowledge of classic furniture. So I'm still very excited about this one! Stay tuned for the slow transformation of this bright little guest room of mine.