
DIY Balloon Fringe Tassels
/I am currently immersed in first birthday party planning for my little girl. Last minute crafting, getting bedrooms ready for out of town guests, wrapping up all of the finishing touches. I feel like the first birthday is such a milestone, and I want to make it a memorable one. I know she won't really remember it now, but I hope one day she can look back on the pictures and see all of the hard work that went into celebrating her first year of life.
We're having a very intimate gathering at our home with some of our closest family and friends. While it is a small affair, I absolutely love planning parties and all of the personal touches that go into them. So naturally, I've exhausted my frugal, perfectionist, DIY self into making almost everything myself (with the exception of the cakes--although I am adding my own decoration to them). Pinterest, of course, has been a great inspiration. What did we do before that little site came along?
One of the ideas I got from Pinterest was making fringe tassels for the oversized balloons I purchased. I love those guys. Anyway, I wanted to create some tassels to go on them for Auden's first birthday pictures and her party. Luckily, I found this tutorial by Firefly Events that described how to do just that.
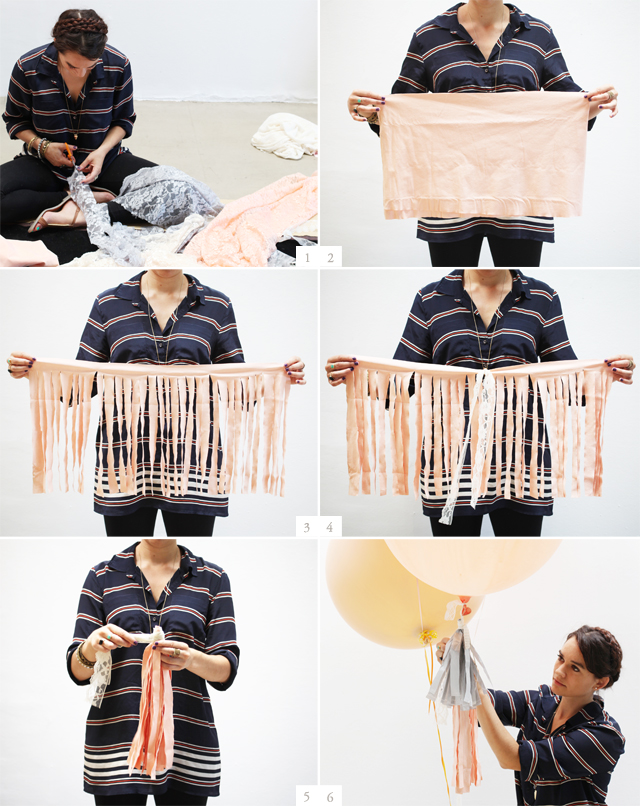
Image via Sweet Thing Blog
I followed her steps using some shirts I found at a local thrift store and some lace ribbon I had from a previous project. The total cost (minus the balloons) was $4 ($2 per shirt). You could obviously go to a fabric store to select your choice of fabric as well, but the closest one to me is across town. And I'm sure I would have spent more there anyway (plus the cost of gas to get there). So the thrift store it was. Win, win. Whatever fabric you end up using remember to take its weight into consideration. Something too heavy will weigh the balloon down. Which is also why using tissue paper is a good option. If you're using more than one balloon, you can obviously have more weight.

Image by Jordan Burch Photography
Here is my finished product from afar. It's all I have to show for now, but I'll be back with more photos and party details later. I absolutely love how it turned out and am sure I will be making many more in the future!
Wish me luck for a smashing party (no pun intended)!... but I can't wait to see what she does with her smash cake :)
